


The mode tab contains a set of predefined expressions and major feature to let you easily and quickly getting started to use WebInput.NET in your application.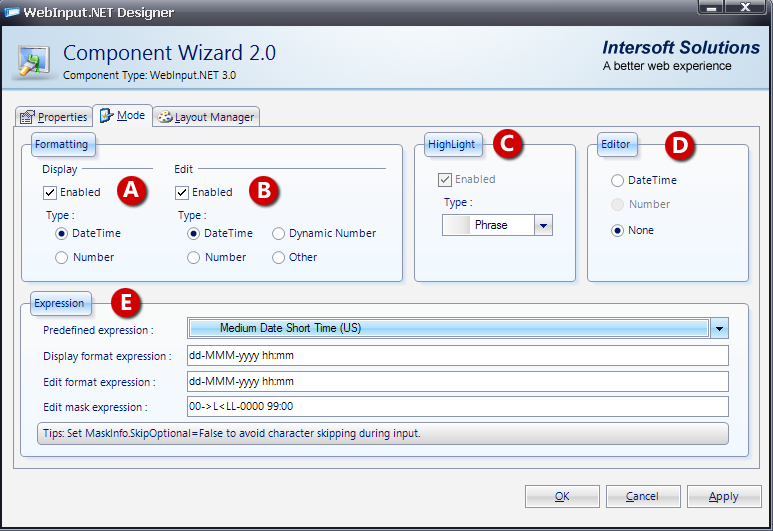
There are 5 sections in the Mode tab to help you setup the WebInput quickly. The details of the sections are as following:
 |
Enabling Display indicates that you want to format the value of your WebInput. When Enabled, you need to specify the Display format expression. | ||
 |
Enabling Edit indicates that you want to use the Edit format expression during editing, instead of using the Display format expression. For example, you want the display to be formatted as short date without time, but you might want to have both date and time element during editing. | ||
 |
Enabling Highlight indicates that you want the character to be highlighted when you click on a text object. You can choose the Type of the Highlight as well. For datetime and masked input, we suggest you to use Phrase type. | ||
 |
Choose one of the editor that suit your data type to power the editing feature and increase end user's experience. | ||
 |
Choose one common expression from the Predefined expression list such as Social Security Number, Medium Date and much more. The required expression will be automatically populated for you once you select the expression.
|

In This Section
How-to: Create currency dynamic number input using designer
How-to: Create phone number input using designer
How-to: Create DateTime input using designer
 See Also
Concepts
{Cleaner and reduced page output through built-in Default Style}
Other Resources
{Layout Manager}
References
DisplayFormat Property
EditFormat Property
HighLight Property